Sunday, January 24, 2010

Homemade Dog Food

A few weeks ago, we had to make a batch of homemade dog food. Our local pet store took a longer holiday than we expected, and poor Monsteress ran out of food.


She is a 3-year-old American Staffordshire and is pretty small: 40lbs. We feed her what we consider the best food available (and I'm happy to support a family-owned Canadian company!): Orijens dog food. We usually feed her one cup of kibble for breakfast and one cup with dinner. Dinner is supplemented with fresh veggies (her favourite treat) or the occasional raw egg.

I started with this "basic dog food" recipe (on the right sidebar) but tweaked it for greater portions of meat and veggies. Here's what I ended up making:

Monsteress's Mash
9 cups water
4 cups uncooked brown rice
1/4 cup oats
275 grams ground lamb
500 grams ground beef (medium leanness)
1 tablespoon olive oil
1 head broccoli, diced
1 green pepper, diced
1 small sweet potato, diced
2 carrots, diced
1-2 tablespooons peanut butter

Combine water, oats, rice, and sweet potato in large pot. Bring to a rolling boil, then reduce heat to low-med. Add meat, oil, and half of the broccoli, green pepper, and carrots; put the remaining veggies in a sealed container to use as fresh garnish. Continue cooking approx 30 minutes or until the liquid is all absorbed. Stir in peanut butter and let cool. Keep refrigerated.

NOTE: the medium ground beef and the lamb were nice and fatty. If using lean beef or poultry, you'll want to add a bit more oil.

It was tempting to add some flavour so it would smell good while cooking, but I reminded myself it was for the dog, not me. Chicken broth would probably make it really yummy, but it would add salt that she doesn't need.

This made a large batch which lasted almost a week. We fed her 1.25-1.5 cups of the mash, topped with the fresh veggies or a raw egg for each meal. We of course also mixed in the remaining kibble for the first few meals, and added a bit of fresh kibble to the last few meals of the batch -- didn't want to switch her diet too suddenly. She ate every last bite!

Sunday, January 3, 2010

FO: Laura's Felted Bowls

My sister was not-so-subtly admiring some felted trinket bowls on Etsy this fall, so I made her a set for Christmas. This was my first dyeing project, and first felting project.


The knitting was very straightforward, and took only a few days to do all four bowls. The dyeing was the most difficult step -- I could not find Kool Aid anywhere in Montreal! I did manage to get some on a little trip to upstate New York, so I was happy about that. I usaed grape, cherry orange, and lemonade. The cherry took the fastest; lemonade had the least effect.

I was planning to felt by hand, so I had an idea to make the job a bit easier. Felting is caused by shocking wool (immersing it in very hot, then very cold water) and applying friction -- so I bought a pair of exfoliating gloves from the dollarstore. They're meant to be used in the shower, but why not use them on the bowls? It did go fairly well, but jeez, hand-felting is tiring! It took two sessions to fully felt the bowls and I worked up a sweat within the first two minutes.

After the two felting sessions, the largest bowl was still a bit floppy, so I sprayed all of the bowls with starch while they were drying. It is still a lottle wobbly, but the three smaller bowls are fine.

Yarn: Garnstudio DROPS Alaska, natural/undyed (3 skeins)
Needles: 6 mm
Pattern: Felted Nesting Bowls by Alice Themla

Overall, I'm very pleased. And my sister loved the bowls!

Saturday, December 5, 2009

Sweet Pin Cushion

After seeing this sweet pincushion, I had to make one! Unfortunately, I don't have many (any) scraps or selvedges, but I do have some pretty cotton prints waiting to be used.


Oh, and I don't know how to quilt but was willing to learn -- except none of my fabrics really complimented each other. So I just made the pin cushion without the quilt squares, or the fancy selvedge pockets. I found a Montreal crafter (on Ravelry!) with a scrap of quilt batting, and got to work.

I used the bird print for the outer pockets and the cushion, muslin for the main piece in center and the backing, and a small floral print for the inside of the pockets. The cushion itself is lined with quilt batting, and stuffed with fine steel wool and some cotton scraps. This will help the needles stay sharp.


The most difficult part of this project was the binding! It was really tricky, and isn't perfect, but that's okay.


This is a Christmas gift for my grandmother, who is always sewing, quilting, or knitting.

Monday, November 16, 2009

WOOL, specifically Briggs & Little's Regal

There is a great article in the latest Twist Collective, called "The Softness Myth" by Clara Parkes. It is an excerpt from her new book, The Knitter's Book of Wool. Click here to read the article. (I had a mini-gush-fest about her Knitter's Book of Yarn last winter, and have asked for the new book for Christmas this year. Whoo!)


Wool is definitely my favourite fibre -- there is so much variety, it looks so crisp, and I love the natrual properties: warm even when wet, flame-resistant, etc. I won't drone on.

This seems like a good time to write about the yarn I am using for one of my current WIPs. My husband had been asking for a sweater, so I picked a few patterns that were within my skill and interest level, and let him pick the one he liked best. Ever unique, he selected Tiennie's Fog Sweater, with the cabled sleeves of Jodi Greene's Durrow. He wanted a plain, manly colour -- brown, grey, dark green, etc -- and no stripes. I chose black, always a favourite and easy to coordinate. I wanted a textured yarn, a little rough and with some lanolin as this sweater will be outerwear... A yarn to last a decade, with what I call "character," and I wanted to support a Canadian yarn maker. (We are going through the Canadian citizenship process for my hub, and I'm always saying how great Canada is, so why not use Canadian wool?)

After some research, I settled on Briggs & Little Regal (Rav page), a worsted-weight yarn from a family-run mill in my home province of New Brunswick. The mill is over 150 years old; my grandmother has knit their yarn for decades. What a legacy! The comments on Ravelry really sealed the deal and assured me that it was exactly what I was looking for.

I tried a few retailers, but none had the quantity I needed, so I ordered directly from the mill. The phone service was great, very friendly, and I was pleased with the prices and quick shipping (orders are mailed the next day). I even asked to please make sure the skeins were of the same dye lot and the woman replied, "Oh, we always do!" I highly recommend them!! You can check out the Briggs & Little site here; there's a virtual tour of the mill.

The sweater is going really well. I haven't taken a picture because a big, black piece of 1x1 ribbing isn't too interesting. I'm halfway through the second hank, and have come across one spot where the yarn was tied off (I just cut out the knot and spit-spliced the ends together). Otherwise, it's been great. There is some variety in the thickness/thinness of the yarn, but I'm sure it will even out upon blocking, and hell, it gives it the character I wanted. It is lightweight: I used 3.5mms for the hem of the sweater, and 3.75mms for the body. The yarn does make my hands a little dry when I work with it, ande there's a bit of vegetable matter to pull out, but nothing major. I'm going to wash and block the sweater before making my final verdict, but so far I am very happy with my choice.

Oh, and I'm very happy with the Fog Sweater pattern too :)

Sunday, November 8, 2009

Enrobed

It has been an embarrassingly long time since I last posted. And I was so excited to share pictures from my little fabric shopping trip in upstate New York -- oh, but I haven't even taken the pictures yet. Oh well. I have so far made 2 skirts -- but it is much too cold to wear them before Spring -- and I just finished up a gift I was making for my hubs for our 1st anniversary, which is next week.

He has a beloved bathrobe that I've been trying to replace without much success... So I figured I'd make a replacement! I got yards and yards (FIVE!) of blue terrycloth at Joanne's during the trip I mentioned (and was able to use a 50% off coupon) -- I'd have preferred a different colour, but light pink and light blue were the only choices. I figured most bathrobe patterns would be the same, so I selected a Simplicity 2-hour pattern. However, it took much longer than 2 hours, as I double- or triple-sewed every seam. I want this to last gosh dang it, and since I was working with terry cloth (and have no pinking shears), I made sure to zig-zag as well straight-stitch every seam.

SOMETHING TO NOTE about the pattern: the measurements on the pattern envelope did seem quite large -- the large size had a chest measurement of 48-50 inches. THAT'S HUGE compared to a man's size "L" t-shirt. I went with that anyway, thinking bigger is better and cozier... Then when I was looking up the pattern to include a pic with this post, I learnt that THIS IS A PLUS-SIZE PATTERN. It does not say that anywhere on the envelope or in the pattern -- the only indication is the measurements themselves, and if you didn't know any better, how could you tell? Anyway, it's just a robe so it's not a big deal, but it should have been marked somewhere. Thumbs down.

I omitted the fusible interfacing from the front band (a lot of hassle for a small result), and also left off the belt loops. I did patch pockets rather than the set-in ones the pattern included, to better match the old beloved bathrobe. It had been ages since I last used a pattern and jeez, I forgot how tiring it is to first cut out all of the pattern pieces, and then pin them down and cut the fabric.

The bathrobe was sewn surreptitiously over a few weekends: I washed and cut the fabric at my mother's house right after it was purchased. (Okay I admit my mum cut it -- I'm left-handed couldn't get her sewing scisssors through 2 thick layers.) I've been working on it while my husband has been out to watch his weekly football game. It had to be done over a few weeks, mostly because of the time it took me to remove the fabric from its hiding place and set up my sewing station, as well as re-hide the fabric and clean up all evidence. TERRY CLOTH SHEDS - A LOT. I've had to sweep each time, as well as use the lint-roller on myself, my chair, the ironing board, the door mat...

Friday, August 28, 2009

Cross Stitch

Last Sunday I did this:

I have been meaning to try cross stitch for a while. When I saw a book on the sale table, I knew it was time! I picked up the supplies from a fabric store; I was surprised at how expensive the Aida cloth was -- and that it wasn't available by the metre, only in a little package. I do have the address of an embroidery store in Westmount, so I will try to stop by sometime soon. After doing these initials based on a chart in the book, I freestyled the little watermelon. No real reason behind it except that I bought blue-grey, pink, and light green embroidery thread. I have sketched something on some graph paper and am hoping to share it soon.

Friday, June 5, 2009

Scheming

When I am done Jack's socks, I will treat myself to 10 skeins of Elann's Camila. It is a 50/50 Cotton Linen blend and I have something special in mind. I have not knit with linen, but the book describesw it as having lovely drape, being quite cool, and just improving in softness, texture, and appearance the more you wash it. It is also a very strong fibre, and there are all sorts of other details that make me excited to try it out. This particular yarn has some lovely projects linked up on Ravelry, as well as great reviews on various blogs. AND at only $2.75 (US) per 112m skein, this will be a very affordable way to so much yardage.

I am excited but am using my willpower to not order a huge amount of yarn.. Until I finish at least one project.

Saturday, May 2, 2009

Knitting Needle Storage

I used to keep my knitting needles in a beautiful vase... But one day it was knocked over and it shattered. No big deal, I knew it was going to happen sooner or later since I am such a klutz; somehow, I am not to blame for its breakage though. Now I keep my needles in a big stainless steel holder, but wanted a better way to organize them. So I made this today:


I did not use a tutorial, but just made a little mock-up out of paper, and then started cutting the fabric. I made sure to make it tall enough that I could fold down the top flap to keep the needles secure:


I picked up the blue and purple fabric last week, and the yellow butterfly print is a vintage bedsheet that I've had for a couple of years. I bought it thinking that it would make a lovely summer dress, but never got around to it (I don't look good in yellow!). I used the hem of the sheet in such a way that I could avoid hemming the tops of the pockets.


I didn't have any pretty ribbon, so it is being held closed with a couple of hair elastics for now. It is quite hefty when it is all rolled up and could substitute as a nice head-whacker in a pinch. THOWK!

I am very happy with this project.

Monday, April 27, 2009

Tea and a Sock


What a nice way to start one's day: with tea and a sock.

The sock is the second half of a pair that I am knitting for my friends' daughter's first birthday. This little girl was the recipient of the first sweater I ever made, and I decided to follow the same strategy to figure out socks: start small!


The sock is just a plain top-down sock that fit my needs: pattern uses sock yarn and is sized for 12mo. I decided to jazz them up a little by adding the cables to the cuff. I really had no idea how much yarn they would take, so I used the bigger of my 2 skeins of leftover sock yarn. In this case, the yarn is leftover from the feather & fan scarf that I knit for my Great-Aunt Jenny. I was a bit perplexed by the gusset instructions, but decided to just gto for it, and I've had great success.

The panda mug is one of a pair that my friend Elise gave to Jack and I as a wedding present. She threw the mugs (on a potter's wheel), glazed them, and hand-painted the pandas and the gold edging. I love these mugs!

Friday, April 10, 2009

Braided Cable Arm Warmers

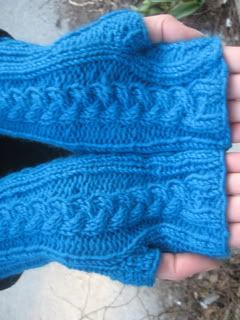
The weekend after I knit my wooly owl mittens, I spent an afternoon playing around with cables. I didn't have a pattern, but was just experimenting with different patterns and widths. I felt counterproductive after so much knitting and ripping, knitting and ripping, so I settled on a nice braided cable and made some arm warmers:


Pattern: My own
Yarn: Jojoland 100% wool in Hawaiian Blue (1.5ish skeins)
Needles: 4.5 and 5mm
New skill: Braided cables

I made these with Spring in mind -- it's bicycle riding season! I don't like to wear mittens when I bike because I find they are too slippery on thr brake handles. And given that I lost one of my nice leather gloves after only a few weeks, I figured I'd make some fingerless mitts. I wanted to make sure they covered my some of fingers and a bit of my thumbs to keep me warm -- it is still pretty chilly in Montreal.

In addition to the extended finger covering, I also made sure to knit extra-long arms on them. I want to make sure no cold air sneaks up my sleeves! The pattern is reversible, so I made two copies of the same mitt.

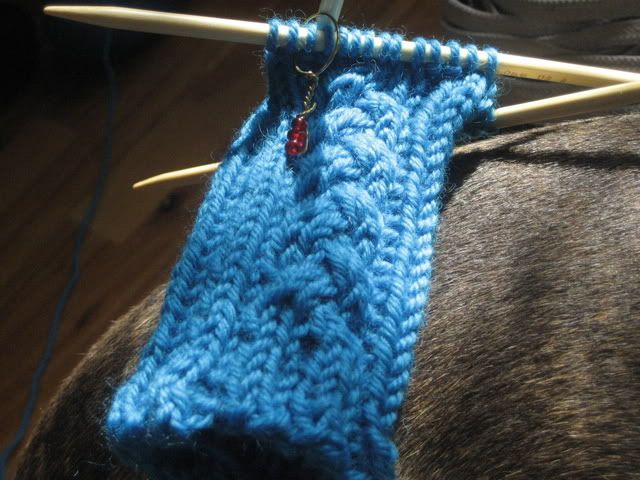
My favourite detail is the way that the ribbing feeds into the cables. Here is the WIP picture I posted whe they were actually in progress:


Overall, this was a great weekend project and I'm very happy with them. I kept detailed notes and have a few tweaks in mind if I ever knit them again.